Friday, November 6, 2009

Finger Prick

I’ve been really busy working overtime for weeks due to the shift I’m assigned to and since I’m having half day on my second last day of official work, I shall clear all my overdue posts. Once again, I won’t be sharing about the routine work I do in the lab since everybody is doing so. I will be sharing about the things I do but not in the lab and within the usual job scope. For the place that I’m attached to, we’ve outreach program. For the one that I was asked to go, a finger prick to test for cholesterol and glucose level was required to be done by me.

Things needed:

1. Lancet

2. Cholesterol meters

3. Glucose meters

4. Cholesterol test strips

5. Glucose test strips

6. Alcohol swabs

7. Cotton wool

Steps involved:

1. Turn on the glucose meter then the cholesterol meter.

2. Insert the respective test strips into the respective meters.

3. Swab the patient’s finger (to be pricked) with alcohol swab

4. Feel the thickness of the patient’s skin and adjust the depth of the lancet accordingly

.

Taken from: http://www.poc.roche.com/poc/rewrite/generalContent/en_US/article/POC_general_article_37.htm

5. Prick the finger and clean off the first drop of blood.

6. Cover the test area completely with blood (first cholesterol then glucose) and wait for results.

I will only be sharing in details about the Cobas Accutrend Cholesterol test. It is used to determine cholesterol in fresh capillary blood in diabetics and non diabetics, for self monitoring, for early detection of a risk of astherosclerosis, for monitoring treatment with lipid-lowering drugs and for screening purposes. Cholesterol esters are cleaved by enzymes into fatty acids and cholesterol, oxidation of cholesterol to cholestenone with the simultaneous formation of hydrogen peroxide, which oxidizes an indicator to its blue radical cation.

Whenever a new pack of Accutrend Cholesterol strips is opened, the meter must be coded. This is done by inserting the code strip into the meter. After which, a QC is done using the Accutrend Control CH1 control solution to check if the meter and test strips are fit for use. When blood is applied, a chemical reaction takes place and the test area changes colour. The meter records this change in colour and converts the measurement signal to the displayed result using the data previously entered via the code strip. Normal cholesterol values are less than 5.2 mmol/L. The measuring range for this meter that I’m using is 3.88 – 7.76 mmol/L. Cholesterol determination may be affected by intravenous infusion of ascorbic acid, bilirubin values greater than 10mg/dL, hematocrit values exceeding 55%, methylaminoantipyrine and gentisic acid.

Enjoy!

Michelle
TG02
0703478H

Thursday, November 5, 2009

ABO Blood Grouping

ABO Blood Group

ABO Blood Grouping is a common test that we have done in our school. However, it is slightly different in the hospital.

ABO Blood Grouping is done to determine the Blood Group of a person using Antibody-Antigen reaction. It has two different parts, one Forward grouping and the other Reverse Grouping. Forward grouping is the reaction between Commercial Serum/Antibody and Patient’s Diluted Blood Antigen. Reverse Grouping is the reaction between Commercial Red Blood Antigen and Patient’s Serum/Antibody.

The tubes are then centrifuged and are checked for agglutination. If there’s agglutination, it shows that there is Ag-Ab reaction. For example, under forward grouping for α tube, only have agglutination; it means that the person has A antigens from the red blood cell. Thus there might be a possibility that the person is Blood Group A. Reverse Grouping is then used to check, thus if there is agglutination in tube B, it shows that the patient has anti-B. This can confirm that the patient is Blood group A since the patient cannot have anti-A if not it will cause transfusion reaction.

Adult ABO Blood Group Procedure

· Print out ABO Blood Group worksheet from the Laboratory Information System using the test code 420500

· Collect the EDTA blood tube and ensure the name and sample number matches with the worksheet printed before proceeding to the test

· Prepare 9 glass/plastic tubes

· Label 4 tubes α, β, αβ and anti D for forward grouping

· Label 3 tubes A, B and O for reverse grouping

· Pour about 1-2ml of Blood into a new tube

· Centrifuge the tube for 5 minutes to collect serum

· Pour about 1-2ml of saline solution into a new tube, prepare blood suspension by pipetting
blood into the saline, and ensure that the blood suspension has about the same colour as the
commercial Red Cell Antigen.

· Pipette 1 drop of Commercial Serum into tubes α, β, αβ and anti D

· Pipette 1 drop of Commercial Red Cell Antigen into tubes, A, B and O

· Pipette 1 drop of Blood Suspension into tubes α, β, αβ and anti D

· Pipette 2 drops of Serum into tubes A, B and O

· Place all 7 tubes into the centrifuge machine and centrifuge for 15 s

· Take all the tubes out and check for agglutination

· Record the Blood Group of Patient

· Ask another Medical Technologist to verify the results you recorded


Baby ABO Blood Group Procedure


Baby ABO Blood Group Procedure is about the same as the adult one. Only that, forward grouping is done only. Reverse grouping is not done, this is because baby do not produce antibodies at young age. So even serum is retrieved by centrifuging, there are no antibodies.

· Print out ABO Blood Group worksheet from the Laboratory Information System using the test code 420500C

· Collect the EDTA blood tube and ensure the name and sample number matches with the worksheet printed before proceeding to the test

· Prepare 5 glass/plastic tubes

· Label 4 tubes α, β, αβ and anti D for forward grouping

· Pour 1-2ml of blood into a new plastic/glass tube

· Wash 3 times with saline solution with each sending for centrifugation

· Each centrifugation is to be 1 minute at 1006g

· Prepare blood suspension and ensure it is of the same tone/colour as the commercial Red Cell Antigen

· Pipette 1 drop of Commercial Serum into tubes α, β, αβ and anti D

· Pipette 1 drop of Blood Suspension into tubes α, β, αβ and anti D

· Place all 4 tubes into the centrifuge machine and centrifuge for 15 s

· Take all the tubes out and check for agglutination

· Record the Blood Group of Patient

· Ask another Medical Technologist to verify the results you recorded

Take note of the blood group, if the results are either AB blood group or Rhesus negative for any blood groups. There is a need to request for baby’s own blood to determine and reconfirm its blood group. As the test is done by using Baby’s Cord Blood, which may have a possibility that the blood of the mother got mixed with Baby’s cord blood, thus giving a discrepancy in the result.

Thats all for me!

Jordan Wong Wei Jie
TG02 0703992H
Grp 09

Bone Marrow Aspiration

Hi all! I won't be sharing about the usual routine things that I do in the laboratory. Instead, I'll be sharing about how to prepare the bone marrow slides as I had the chance to witness a bone marrow aspirate procedure!

First of all, after the lab has been informed about the appointment made, one of the medical technologists (usually the haematologist) will be sent over to the ward to prepare the bone marrow slides. The physician would perform the bone marrow puncture and biopsy using aseptic technique and this is the kit they use:

As for the procedures for bone marrow aspiration, I’ll let the pictures do most of the talking. If you’re interested to know more about it, click on this link: http://www.pathology.vcu.edu/education/lymph/How%20to%20Marrow.pdf

Preparation of bone marrow on slides

Bone Marrow examination is important in the study of haemopoietic disorders and may be the only way to make a correct diagnosis. Comprehensive bone marrow morphology requires the examination of the bone marrow particles, push preparations, trephine biopsy imprints, trephine biopsy and correlation with peripheral blood picture. Valid interpretation requires consistent preparation of these samples.

The reagents and equipments needed are 20 microscope slides, at least 2 good spreaders, gauze, plastic plates for isolation of bone marrow particles, glass marker pen, disposable transfer pipette, EDTA tubes and slides holder.

The steps involve are:
1) Obtaining Specimen
- Check patient's name ID
- Ask for EDTA blood for peripheral blood smears ( at least 2) before the bone marrow aspiration procedure
- Transfer aspirate (0.5 ml) into EDTA tube as quickly as possible. Mix gently but thoroughly. Recollect the specimen if there are no fragments.
- If trephine biopsy specimen is also taken, make imprints by gently rolling specimen (at least 1 cm) between 2 microscope slides. Make at least 3-4 imprint smears.


- Transfer biopsy specimen into a bottle of formalin.
- Label all smears and EDTA tubes wit patient's ID, accession number and date.

2) On return to laboratory
- Expel the aspirate onto a plastic plate. Hold the plate at an angle so that fluid will run down the plate leaving bone marrow particles isolated.
- Transfer suitable materials onto microscopic slides and make smears as quickly as possible. At least 12 slides are required. Make extra smears if the patient is a suspected case of leukemia.


- Label all specimens and smears
- Patient's original request form, slides holder containing 10 marrow slides and 2 blood smears, EDTA tube of excess marrow and EDTA blood are all placed into a dispatched box and acknowledgement slip to be sent to NUH haematology laboratory and dispatch trephine biopsy specimen to NUH histology department.

Bone marrow aspiration is a really painful process. Hence, the physician doing the procedure must be trained and skilful in it so that the patient does not need to go through unnecessary amount of puncture before the physician succeed. Furthermore, the medical technologist preparing the bone marrow slides must know the procedures and criteria well so as to be able to produce satisfactory slides for proper evaluation. This is to prevent the slides being rejected by NUH and patient undergoing a second bone marrow aspiration.

All pictures are taken from: Riley, R. S. (2009, October). An Illustrated Guide to Performing the Bone Marrow Aspiration and Biopsy. Richmond, Virginia, United States of America.

That’s all folks!

Michelle

TG02

0703478H

Wednesday, November 4, 2009

Laboratory Techniques - In vitro organ bath experiment

HELLO PEOPLE! THIS IS ADDITIONAL POST FROM RENEE!!

hahaha! just feel like sharing another skill that i have learnt during my attachment - that is ORGAN BATH!

In-vitro organ bath is actually a set-up for us to conduct experiments on muscle strips. The muscle strips are either obtained from humans or laboratory animals and placed into the organ baths for isometric or isotonic measurement.

Isotonic measurement would estimate the variation in length of the muscle tissue without any change in tension, while isometric measurement would study the tension that is accumulated within muscle tissues without any visible change in the length of the tissue.

In my experiment, we take the isometric measurement of the corpus cavernosum smooth muscle under the influence of my test drug. We do this because a relaxation in the corpus cavernosum smooth muscle would mean erection, and therefore, we want to see if the drug actually causes decreased tension in the corpus cavernosum.

What i did was to pre-contract the corpus cavernosum strips with noradrenaline, which is a drug that would cause increase tension in the corpus cavernosum. After that, i add in cumulative concentrations of the drug that i am testing to see if there is a decrease in tension.

What i hypothesize to get would be concentration dependent decrease in corpus cavernosum tension, so that i would be able to get a dose response curve.

Photobucket

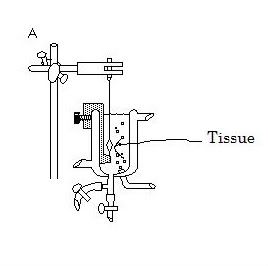
Picture retrieved from : http://www.currentprotocols.com/protocol/ph0403

This is the schematic diagram of an organ bath. The tissue is tied with a thread and mounted onto the organ bath. Tissue is bathed in tyrode solution and bubbled with oxygen and carbon dioxide. Drugs are added into the solution.

Thats all folks.
feel free to ask me questions: ))

Love
Renee
TG02
0703634F

Colony Counting Assay

Colony counting assay also determines the toxicity of the anti-cancer therapy, but in this case it determines if the cells will grow after the cells have been treated. So the cancer cells will first be seeded on 24 well plates and incubated overnight. The next day, the cells are treated with the respective treatments and incubated. After treatment, the cells are trypsinised and replated on a new 6 well plate at a seeding density of 2000 cells per well. The cells are then maintained for 2-3 weeks with the media replaced every three to four days. At the end of the assay, the cells are stained with crystal violet for 1 hour. Lastly, the colonies are counted and imaged using a stereomicroscope (Nikon, U.S.A.) at 10× magnification, in five microscopic fields per well (one central, four peripheral).


Above is an example on how the plate will look like after the colonies have been stained. The first one would most likely be the control , hence many colonies can be seen. The last one would be the drug polymer and TRAIL, a ligand that binds to the
TRAIL receptors found on cancer cells, to induce apoptosis.

Gwendolynn Tan
TG02
0703953J

Occult Blood (OB) Test

Hi!Terribly Sorry for the delay

I'm Jordan Wong from TG02 and will be posting on a post on "Occult Blood Test"

OB Test

OB Test refers to Occult Blood Test. Occult Blood Test is done usually to determine if there is any hidden (occult) blood in the stool/faeces. It helps us to find out whether if a particular person is suffering from any colorectal cancer or gastrointestinal bleeding (from mouth all the way to colon).

In order to perform the OB Test, stool samples from patients are collected as specimen and stored in an OB cassette, which will then be sent for processing using the Occult Blood Test Analyzer, Diana OC Sensor by Eiken.

1. Quality Control

As usual, for all analyzers or machines that are used for running and processing samples, there is a need to run/perform Quality Control before the samples are sent for running. This is to ensure that the results/values the machine or analyzer is producing is precise and accurate. If not the results of samples may not be accurate, which may caused an analytical variation. Therefore Quality Control is an important procedure for all machines and analyzers in the laboratory.

Performing of Quality Control

• Prepare 4 Hitachi Cups for QC High and 4 Hitachi Cups for QC low

• Label the date (for example 24/07) and QC High/Low on the Hitachi Cups

• Take out the QC reagent from the fridge and let it cool to room temperature for 15 – 30 minutes

• Ensure and check that the Lot number of the QC reagent and the Lot number noted on the machine is the same before continuing

• Using the blue pipette, calibrate it to exactly 1000ul (1ml)

• Using the blue pipette, pipette exactly 1ml of deionised water into each QC reagent bottle

• To ensure well-mixed, Spin the QC reagent bottle for 15 – 30 minutes using the Nutating Mixer by GyroMini

• Pipette 200ul of QC reagent into each Hitachi cup (Total 4 cups)

• Remaining 200ul, pipette into each Hitachi cup drop by drop, ensuring that all 4 Hitachi cups has the same amount of well mixed QC reagent

• Place the Hitachi Cups for QC High and QC Low into the dark blue rack and send it for machine to run. [Dark Blue racks are meant for Quality Control]

• Wait for results to come out and ensure that the values produced for QC High and QC Low is with-in the reference range given by a standard/company

2. Preparation of Samples

For OB Test in the laboratory, samples sent come in two types. Some come in OB cassettes while some come in stool bottles. As usual, samples that are sent were being signed, opened and registered. The samples will then be labelled, for OB cassettes; the label sticker must be labelled with the barcode facing the middle so that the sensor in the OB machine is able to read/scan the barcode into the system. OB cassettes has stool specimen in it, so the cassettes can be sent for processing right away.
However, some patients will send in Stool Bottle, where there might be other stool tests to be done other than Occult Blood (OB). Other stool tests may include Stool Culture and Stool FEME, thus a stool bottle containing the stool will be sent. Once we receive stool bottles from the admin department, we will go into LIS Edit Lab Request to check for the pending tests the patient enquired, if there is a pending test for Occult Blood, then there is a need to prepare OB cassette from the stool bottle.
As I said, in order to run Occult Blood for the ones with stool bottle, we will have to place the stool specimen from the bottle into the OB cassettes. This procedure will usually be performed in the safety cabinet at microbiology department.

• Label the OB cassette with the patient’s lab number

• Remove the cover of the OB cassette

• Place it into/onto the Stool Bottle, to retrieve some stool specimen

• Cover back the cover of the OB cassette

• Proceed to the Admin to print the correct label before the cassette is sent for processing

• During printing of label, enter the patient’s lab number, the code of the specimen, in this it will be 30 and click print

• Label the cassette properly, ensuring that the barcode is labelled on the middle of the OB cassette.

• OB cassette is ready for processing.

There are times where the stool cannot be scooped by the spoon of the stool bottle into the OB cassette, therefore we were taught to use ice cream sticks to retrieve some stool specimen and place it into the OB cassette.

3. Merge Stool and OB cassettes

There are times where stool samples or OB cassettes do not come together on the day itself with other samples in the package. Thus these samples will arrive to the lab the next day, a few days later or even months later; we call these samples as merge samples. These merge samples come with a merge form. On the merge form itself, they will tick the type of sample. For example, merge urine is sent to the lab; the merge form will record and tick that urine is being sent. So upon receiving such merge samples, we will help merge the samples into the LIS system.

I. Ensure the samples received matches with the record on the merge form (A tick on the urine means only urine sample is sent)

II. In the LIS system, go to edit Lab Results, a screen will open; enter either the name or the IC number of the patient into the LIS.

III. A new window will open, now search for the recent package the patient has recently registered, record down the lab number of the patient.

IV. Now go to edit lab request, enter the lab number of the patient. Next, under cancel test and test info, ensure that the package has the test where the respective sample was sent. (Let’s say Urine Bottle was sent, ensure that the package includes urine test in the system)

V. If it correct, record the lab number on the merge form (0909090123) and also record down the day the sample was received.

VI. Under specimen information in edit lab request, enter the code for the specimen to register the samples into the system. (Urine Bottle = 23, Stool Bottle = 30, OB cassette = 31 & 32, Plain tube = 01, EDTA tube = 02 and Pap smear = 09)

VII. Ensuring what you merged was correct in the system, click saved. Next, go to print the label by entering the lab number and the respective code for the specimen.

VIII. Paste the label on the sample, highlight the lab number on the label and sent it to the respective department to run/process.

4. Running of Samples

All OB cassettes and Stool Bottles will be sent to the Haematology Department and be placed into a yellow rack. In order to process/run the cassettes, we will place all OB cassettes into a light blue rack. Each light blue rack consists of 10 slots, which enable to hold 10 OB cassettes and a rack number is provided. [Light Blue racks are meant for processing/running of OB samples]

While slotting the OB cassettes into the test rack, we have to ensure that the barcode label of the OB cassette is in the middle. We also need to ensure that all papers or sticker must be removed from the OB such that it will not cause a hindrance when the OB is being processed. After ensuring that the OB cassettes are properly placed into the test rack, placed the rack onto the machine, aligning with the machine tray. Click set sample for the machine to run the OB cassettes.

5. Verifying of Results

Once all the samples are processed/run, the light blue racks will be shifted to the left hand side of the machine, result slip will be printed out from the top. Then, a screen will appear saying analysis is done. The result slip consists of several information such as rack number and position, results of the OB sample, lab number of the patient and the number of OB cassette being processed. Upon completion of the analysis by the OB machine, we can then verify the results of the patient.

For verifying of OB results, we can verify in two ways, the first one is by Lab number and the other way is by Test Code. By verifying through Lab Number, enter the lab number of the patient, click under the logical column, under the Occult Blood row, and enter the results of the patient. 1 represent for Negative and 2 represent for Positive. In addition, for all positive cases, we will have to enter the value of the results in ng/mL under the memo corner. Lastly, click verify changes for whatever changes that was done and click save. After all those procedures as described, the patient’s results for OB were verified.

To verify using the Test Code method, we will open 2 LIS window, and enter two test codes, as Occult Blood has two test codes, 475700 and 475702. 475700 refer to Occult Blood while 475702 represent Immunological Faecal Occult Blood. Some samples are registered under 475700 test code while some are registered under the 476702 test code. Thus we open both to ensure that all registered OB samples appear in the system so as to verify them. However, using this method will hang the LIS system in the whole lab, therefore it is not often used unless necessary like when checking pending only. Verifying is usually done through lab number. After opening both test codes, once again enter 1 which represent for Negative and 2 which represent for Positive. In addition, for all positive cases, we will have to enter the value of the results in ng/mL under the memo corner. Clicks verify changes for whatever changes that was done and click save.

6. Closing of OB machine

Occult Blood Machine only run OB cassettes from morning till afternoon about 4pm only. After which, the machine will be closed. Before closing OB machine, we will usually check OB pending first where it serves to ensure/ to make sure that all OB cassettes that were registered are processed and verified or if it wasn’t processed then must ensure that the OB cassette is present for processing the following day. After checking OB pending, if there are no problems, then the OB machine can be closed.

• From the analysis screen, Press/Click close

• Wait till screen appears as Main Screen

• Press/Click Maintenance

• Press/Click Close Mode

• On the next screen, ensure that that it is Yes No Yes.

7. Checking Occult Blood Pending

Occult Blood Pending is done three times daily. Once in the morning, after running a batch of samples that was left during the previous day after the OB machine was closed. And another once more, in the afternoon, before the machine is closed at 4pm. Lastly, one more time of pending after all OB cassettes / Stool samples are merged and registered.

To check Occult Blood Pending, 2 LIS windows must be logged in. Then, open the two test codes for OB, 475700 (Occult Blood) and 475702 (Immunological Faecal Occult Blood). Wait till both test codes are completely opened. Then, look at both the screens; ensure that there are no samples listed in the screen. If there is, it is either not verified yet or the samples are just registered. Therefore, make sure that all OB results are verified. If samples are not process yet, make sure there are available for processing the following day.

As stated, after all OB cassettes / Stool samples are merged and registered. Open the OB pending for the third time. Using Microsoft Excel, print the OB pending (475700 and 475702) and ensure that the list of samples found in the pending matches with the number and the correct OB cassette(s) that were registered.


Transferring of Stool Specimen from Stool Bottle into OB cassette


Transferring of Stool Specimen from Bottle to OB cassette


This is a Stool Bottle : Used for Preparation of OB cassette specimen and other Stool Tests


These are all the require solutiones for Occult Blood Machine.

They are mainly Purified Water, Wash Solution and Drain (Waste)


This is our lab's Occult Blood Machine


10 OB cassettes slotting into 10 slots on the Light Blue Racks


This is a OB cassette


This is the Light Blue Racks for Patient's OB cassettes to be processed


Placing Stool from Stool Bottle into OB cassette


This is the Dark Blue Racks for running Quality Control in the OB machine before processing patients samples.


This is the Orange Racks used for running samples that requires Dilution in the OB machine.

Do you have any questions, do post it on our blog

This is all i have to share for today!

2 MORE DAYS!

Enjoy your final moments!

With Regards
Jordan Wong Wei Jie
TG02 0703992H
Group 9

Cell Cycle Analysis

Cell cycle analysis involves using flow cytometry so as to analyse the toxicity of the anti-cancer treatment through the number of cells in each cell cycle. The process is done by first seeding the cells overnight and treated with various kinds of treatments such as anticancer drug, doxorubicin. The cells are then trypsinised from the wells and harvested by centrifugation. Resuspension of the cells is conducted and the cells are fixed with fixing solution, then stored at -20 ºC overnight. The next day, the fixing solution is removed by centrifugation and then decanting of the solution. The cells are then stained with the staining solution for 1 hour, so that will be detected by the flow cytometer. The samples are then measured at low flow rate at an excitation wavelength of 488nm and emission of orange/red fluorescent. Cells at sub G1 phase indicate death. So the higher the number of cells at the sub G1 phase, the more toxic is the anticancer treatments.


This above shows how the flow cytometer presents the results after reading the various samples treated by the various treatments such as the anticancer drug, doxorubicin.

Gwendolynn Tan
TG02
0703953J

Wednesday, October 21, 2009

Laboratory Technique: Liquid Chromatography- Mass Spectrometry

Hello!!

Today I will be talking about a highly specific, ultrasensitive method, Liquid Chromatography- Mass Spectrometry (LC-MS).

Principle
LC-MS is using a combination of techniques, liquid chromatography and mass spectrometry.
The type of chromatography that I’m using is liquid chromatography which involves the use of a liquid mobile phase and a column stationary phase. The purpose of chromatography is to separate compounds in a complex mixture. Mixture is added to the automated instrument, LC, where the compounds in the mixture will distribute or separate themselves between the mobile and stationary phase to varying degrees. Compounds that are retained strongly by the column will be eluted out slowly with the flow of mobile phase while compounds that are weakly held by the column will be eluted out rapidly. The solvents that I use for my liquid mobile phase are polar solvents and the stationary phase is a non-polar column. Therefore, the compounds are separated based on polarity. Hence, those compounds that are polar will be eluted out first with the mobile phase and non-polar compounds will be retained by the column and eluted out slowly. This will then results in different retention time.
After the separation of compounds, each compound will then pass through the mass spectrometer for detection. Inside the mass spectrometer, there are a few components.
1) The inlet system: It will direct where the injection of eluent (from the LC) should go, either to the waste or to the MS.
2) Ion Source: It is for the ionization of compounds to form molecular (molecular = parent ion) and daughter ions (further break down of the parent ion). There are two types of ion mode, positive and negative. There are different types of ion sources, examples are electrospray ionization (ESI) which uses high electrical field, thermospray ionization (TS) which uses high temperature, and matrix-assisted desorption/ionization (MALDI) which uses laser beam.
3) Mass analyzer: The ions will be scanned by the analyzer
4) Detector: After scanning, the ions will pass through the detector for detection
5) Signal processor: After detection, signal is generated and shown as mass spectrum. Using a special kind of software for the instrument, it will quantitate the amount of compounds.

Application of LC
The main application of LC is to separate compounds. There are a lot of people who uses LC to separate compounds and use the purely isolated compounds for other experiments.

Applications of MS
MS has the ability to detect well and is capable of providing information about the elemental composition of samples, the structure of inorganic, organic, and biological molecules, and the qualitative and quantitative composition of complex mixtures. People use MS to detect new compound or to use MS to measure compound of interest in a sample.

Using LC-MS to measure progesterone
For me, I used LC-MS to measure progesterone concentrations, but it can also be used to measure other compounds too. The sample that I’m using is plasma and it contains all kinds of compounds therefore LC will first separate the compounds and MS will detect. I used SRM (Selected Reaction Monitoring) where I specifically type in the molecular and daughter ions of progesterone. The machine will then specifically detect progesterone for me. The mass spectra produced will shows a lot of peaks because there are a lot of different compounds present in the sample. But when I use SRM, it will tell me which peak belongs to progesterone, the time where progesterone is being eluted out (retention time) and the intensity of the peak. After getting the mass spectra of progesterone, the amount of progesterone (in ng/ml) is calculated using the software.

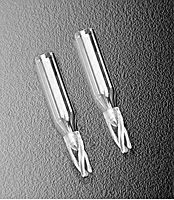
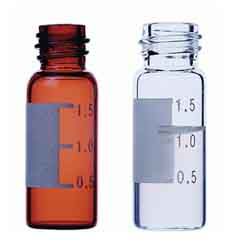
Before loading the sample into LC-MS, the sample is extracted first (mentioned in the previous post). After extraction, around 100ul-150ul of the extracted sample is added into the glass insert and the glass insert is placed inside the sample vial. The sample vial is then loaded onto the LC-MS.


Glass insert

Schematic diagram of a glass insert
Retrieved on October 22, 2009 from website http://www.chem.agilent.com/en-US/Store/_layouts/Agilent/Commerce/ProductDetail.aspx?productID=5183-2088

glass insert

Glass insert
Retrieved on October 22, 2009 from website http://images.google.com.sg/imgres?imgurl=http://jgfinneran.thomasnet.com/ImgMedium/629GLASS.jpg&imgrefurl=http://jgfinneran.thomasnet.com/product/inserts-shell-inserts-12-x-32-mm-/inserts-glass-1270&usg=__rxpk0TG0xG9Ls-TcJckUHUXxHBc=&h=200&w=174&sz=31&hl=en&start=7&tbnid=2VvSmLXopeUazM:&tbnh=104&tbnw=90&prev=/images%3Fq%3Dsample%2Bvial%2Bwith%2Bglass%2Binsert%26gbv%3D2%26hl%3Den

sample vials

Sample vials
Retrieved on October 22, 2009 from website http://images.google.com.sg/imgres?imgurl=http://www.nationalscientific.com/products/images/013-Product.jpg&imgrefurl=http://www.nationalscientific.com/vials/products.aspx%3Fid%3D13&usg=__O375JpYTpU7adXng45qCvA9L0BI=&h=249&w=225&sz=34&hl=en&start=60&tbnid=9EIOFx9VQHykfM:&tbnh=111&tbnw=100&prev=/images%3Fq%3Dsample%2Bvial%2Bwith%2Bglass%2Binsert%26gbv%3D2%26ndsp%3D18%26hl%3Den%26sa%3DN%26start%3D54

In order for the needle to inject properly, glass insert is needed to raise the height. When handling large amount of sample, sample vial without the glass insert is used.

That's all!!!

Zhang'e
0704086H
TG02

Wednesday, September 30, 2009

Laboratory techniques - ELISA

Hello everyone, today i would share with you about ELISA!

ELISA, also known as enzyme-linked immunosorbent assay, is used in my laboratory to test for the concentration of cyclic GMP (guanosine monophosphate) or cyclic AMP (adenosine monophosphate)in cultured corpus cavernosum cells.

Cyclic GMP and cyclic AMP are secondary messengers that are involved in the relaxation of the penis. Therefore, an increase in these levels in the corpus cavernosum smooth muscle cells when treated with the test drug would prove that the drugs actually have relaxation effect on the penis.

In my lab, we use commercially purchased competitive ELISA kits to perform these assays. Before performing the assays, we have to culture the smooth muscle cells to passages 2 - 5. The lower passages are encouraged to be used so that the cells remain healthy.

When we get confluent flasks of smooth muscle cells, we seed them to 6 well plates to be grown to confluence. This usually takes a day for the cells to reach confluence in a 6 well when about 4.0x10⁵ cells are seeded per well.

The experiment is continued on the next day, when the wells are confluent. The spent DMEM is removed from the wells and new FBS-free DMEM is added to the wells, followed by addition of IBMX (isobutylmethylxanthine), which is a non-specific inhibitor of phosphodiesterase (PDE), and the test drugs. We add IBMX because we do not want the PDE to break down any cyclic AMP and GMP so that we are able to detect them at the end of the experiment. The test drugs that I use are testosterone and a plant extract that is supposedly able to increase the cyclic AMP and GMP levels. Control wells have no drugs added to them.
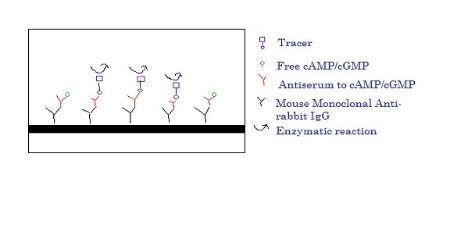
The wells would be incubated and the supernatant would be removed from the wells. Hydrochloric acid is added to lyse the cells followed by physical lysing with a scraper. The supernatant would then be spun so that the supernatant would be separated from the cell pellet. Supernatant would be collected and diluted in different concentrations and then acetylated. The acetylated samples, together with antiserum (specific to cAMP/cGMP) and tracer (which is acetylcholinesterase linked to cAMP/cGMP) are then loaded into the 96-well plate that is coated with mouse monoclonal anti-rabbit IgG and incubated for 18 hrs.
After 18 hrs, the plates are washed and the substrate to acetylcholinesterase is added. The plate is then incubated for 30-90 minutes to allow enzymatic reaction to take place where a yellow colour would be produced. The plate is then read with a spectrophotometer.
The intensity of the colour would be proportionate to the amount of tracer that binds to the well, which would be inversely proportionate to the amount of free cAMP/cGMP that is found in the sample. Therefore, the higher the reading of the plate, the lower the amount of cAMP/cGMP is found in the sample. Therefore, to show that my drugs are working, I would have to obtain cAMP/cGMP levels that are higher than the control.

Photobucket

Sorry for my ugly drawing. But hope that explains to you all about the assay that I am conducting. Feel free to ask questions: )
Love,
Renee
TG02
0703634F

Monday, September 21, 2009

Laboratory Technique-Fecal Extraction

Hello! Zhang’e here. I’m going to share with you how fecal extraction is done.

Feces were first dried using a savant rotator evaporator for 2-3days and were then pounded into powder form. 0.200g of each powdered feces was weighed out in labelled 16 X 125mm glass tubes and 4.5ml of ethanol and 0.5ml of distilled water (90% ethanol) were added to each tube. The tubes were vortex briefly and placed in a water bath at 96° for 20 minutes. The rack was kept from touching the bottom of the water bath to prevent splattering of tube contents. 100% of ethanol was added continuously to the tubes during boiling to prevent boiling dry. After boiling, 100% ethanol was added to all the tubes to bring the volume of the extract up to approximately pre-boil levels. The tubes were centrifuged at 2500rpm for 20 minutes and the extract from each tube was poured off into a second set of identically labelled 16 X 125mm tubes. 4.5ml of ethanol and 0.5ml of distilled water (90% ethanol) were added to the original set of tubes containing the fecal pellet. The tubes were vortex for 30 seconds and centrifuged at 2500rpm for 20 minutes. The extracts were again poured into the second set of tubes containing the first extract and the second set of tubes was dried down under air (nitrogen) in a warm water bath (80°). The dried down extracts were re-suspended with 1ml of buffer ‘S’, vortex briefly, and sonicated for 15 minutes. The extracts were poured into labeled 12 X 75mm plastic tubes and were kept for storage.

-In this extraction, ethanol is the solvent used and through vortexing and boiling, the hormones are extracted out of the feces.
- Centrifugation separates the extract (containing the hormones) from the fecal pellet.
-The purpose of extraction is to concentrate the amount of hormones by using ethanol to absorb/pick up the hormones and separates them from interfering compounds (such as steroid-binding proteins) and the extracts obtained are used for hormone assays. (Rather than using the whole feces to perform the assay)

Thats all! It is simple but it takes a day to finish the whole process!

Zhang'e
0704086H
TG02

Saturday, September 12, 2009

Urine Microscopic Examination

Hey People! Sorry and I apologise for the late post!

Today i will be talking all about Urine Microscopic Examination

Microscopic Examination is performed under Urine FEME. FEME stands for Full Examination including Microscopic Examination. Therefore, for urine FEME, microscopic examination is included and it is quite an important component too. As mention in my previous post, I mentioned that Microscopic examination is actually performed to verify the results produced from the urine analyzers, Miditron Junior II or Cobas u 411 (Roche).

So how do we perform Microscopic examination?
1. Enter code 472100 to print out Urine FEME worksheet
2. Perform Urine Processing using the Urine Analyzer, Cobas U 411 and enter the results into the Worksheet
3. Charge 15.0ul of urine using the pipette into the Glasstic® Slide 10
4. View the Glasstic® Slide 10 under the microscope

Upon viewing of the microscope, we are supposed to look for the grids/chambers in the slide at 10 times magnification. After which, we will focus at 40 times magnification to view and count the cells. When counting the cells, we will only count the first 36 squares, meaning the first 4 rows of 9 squares.

There are three important cells that we need to look out for; they are mainly the Red Blood Cells (RBC), White Blood Cells (WBC) and Epithelial Cells.
Of course, when viewing the Glasstic® Slide 10 with microscope, we will also look out for other cells like Crystals, Casts, Bacteria, Yeast and Sperm etc.

The Picture below shows White Blood Cells and Bacteria


This Picture below shows Epithelial Cells


Yeast and Bacteria, if found in Urine sample, would infer that the patient is suffering from a bacterial infection or it may be due to a pre-analytical variation. Such as when the way we handle the urine samples and how the urine sample was collected from the patient. There may be a contamination when the urine is collected.

The Picture below shows Yeast Cells, and some with budding.


Under Crystals, there are amorphous crystals, calcium oxalate and uric acid. There are two types of amorphous crystals depending on the urine pH.

If the urine pH is acidic (less than pH7), the amorphous crystals will be called as amorphous urate.

If the urine pH is alkaline (>pH7), the amorphous crystals will be called as amorphous phosphate. The crystals when looked through in the microscopic looked very scattered around the chambers/grids and it looks bright.


Calcium Oxalate is also a common crystal found in patient’s urine. They have different shapes, like dumb-bell and the most commonly ones, the square shapes. They look shiny and bright too.


Uric acid looks often like leave shaped; they are often yellow to orange-brown in color. Under polarized microscopy they exhibit birefringence and many colors.


The casts are a glob or bunch of cells released from damaged renal tubules. While Casts, they look dull and faint; there are two types of casts we report in Urine FEME. Hyaline casts and Granular cast are the ones that we report.

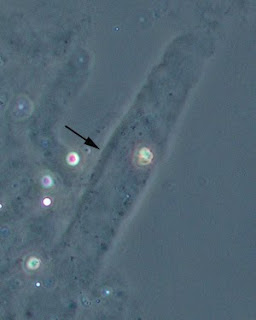
This Picture below shows a Granular Cast


This Picture below shows a Hyaline Cast


In here, I will be telling you more about how we record all these on to the Urine FEME worksheet when we see these cells, whether is there is a need or not to record/report into the report for the Patient
.
For all cells we see, we categorize them into 4 different categories. There are Trace, 1+, 2+ and 3+. These 4 different categories represent the amount of cells in the urine during the microscopy examination; Trace, in short Tr being the least amount and 3+ being the most amount.

On the Urine FEME worksheet, the worksheet will include the sample number (0908100200), the name (Wong Jordan) and 16 columns for each patient. First ten columns will be used for the record of results from Urine Processing using the Cobas u 411 Analyzer. They are mainly, pH, Specific Gravity, Protein, Leucocytes, Glucose, Ketone, Nitrite, Blood, Bilirubin and Urobilinogen respectively. The next 6 columns will be used for the counting of cells from the microscopy examination. They are mainly, Red Blood Cells, White Blood Cells, Epithelial Cells, Casts, Crystals and Others. Under Other’s column, it refers to the Presence of Sperm, Bacteria and Yeast etc. Scroll down to look at a sample of the Urine Worksheet.

Upon getting the result from Urine Processing from Cobas u 411, we will record down the results on the first ten columns. Using the 4 categories, Trace (Tr), 1+, 2+ and 3+.

After recording all the 10 results of Urine Processing, we will have to make some changes or do some confirmatory tests.

Confirmatory Tests

For both Glucose and Ketone, as long as there is Trace and above, a Ketone and Glucose Confirmatory Test must be done by using the KETO-DIABUR-TEST® 5000.

For Bilirubin, if it is 1+ and above, there is a need to perform the Bilirubin Confirmatory Test by using to Icotest® Reagent.

For Urobilinogen, if it is 2+ and above, there is a need to re-process (do a dip stick again) and reconfirm the result of Urobilinogen using the Cobas u 411 analyzer.

For Protein, if it is Trace and above, we will have to look for cast. If there is no cast, we will need to centrifuge the urine for 3 minutes and reload the new sample and view under microscope to look for casts.

Changes we need to do

If Bilirubin is Trace, do not need to report, and record as Negative instead.

If Urobilinogen is 1+ and below, do not need to report and record as Negative instead.

For Nitrite, it is only reported positive when, white blood cell is more than 1+ (18) and bacterial is seen during microscopy examination.

When viewing Microscope, we will see Red Blood Cells, White Blood Cells and Epithelial cell, the three main ones. We also separate the each of them into 4 different categories after counting them. The 4 categories are Trace, 1+, 2+ and 3+ also.

After we see the number of cells in 36 small squares of the Glasstic® 10 Slide, we will multiply by 2.5 to get the actual total amount of cells. After which we will record down the number of each cells on each column and then make changes to the results of Blood, Leucocytes and Protein from Urine Processing, as microscopy examination is done to verify the results of Urine Processing.

For Red Blood Cells

Red Blood Cell Category Number of Cells (After multiplied by 2.5)
Trace 5 – 10
1+ 13 – 20
2+ 23 – 30
3+ 33 and above or >3000

For White Blood Cells and Epithelial cells

White Blood Cell & Epithelial Category Number of Cells (After multiplied by 2.5)
Trace 8 – 10
1+ 13 – 20
2+ 23 – 30
3+ 33 and above or >3000

In addition, there is a rule that we need to apply, which is whenever the RBC/WBC count is more than 1+ or Epithelial Cells is more than 18, we will have to change Protein to Trace under Urine Processing Results.


For example, look at the two pictures below, both shows 2 different results from Urine Processing of 2 different urine samples. The results will be written on the 10 columns as shown in the worksheet. Observe that the lab number and name is given. Now, moving on will be a microscopic examination of counting cells. So for my first urine sample, lab number 123, I saw 15 Red Blood Cells, 18 White Blood Cells and 0 Epithelial Cells. We will now make changes, where we will change the initially RBC Tr into 1+ and change WBC Tr to 1+ also. I also observed this urine sample have amorphous crystals. To determine what type of amorphous crystal it is, look at the pH result you got. Since, it is pH 6, the type of crystal is Amorphous Urate (AU) and I report it under the Crystal column. I also observed that there are Bacteria in the urine sample, in order to report Bacteria under Others column, WBC must be 1+ and above. Since my WBC is 1+, I can report Bacteria. As I said, if Bilirubin is Tr and below & Urobilinogen is 1+ and below, report as Negative, thus change both the results to Negative as shown.

Urine Processing Result 1


Urine Processing Result 2


For the second urine sample that was performed. The results shown were quite normal except for Trace in RBC. After looking at the microscope, if no RBC is seen and no other cells seen, we will just put a 1 under Epithelial Cell column to show that this urine sample is “clean” meaning no cells seen. And also, change the RBC from Tr to Neg.

Urine Worksheet Before Edit (Before Microscope Examination)


Urine Worksheet After Edit (After Microscope Examination)


Reporting of Crystals, Casts and Other Cells

If we see Cast and Crystals, we will report under the Cast and Crystal columns respectively. Other column will be for cells like Sperm, Yeast and Bacteria

For Cast, we report only Hyaline Cast (HY) and Granular Cast (GR)

For Crystals, we report Calcium Oxalate (CA), Uric Acid (UA), and Amorphous Urate
(pH7 – AP)

For bacteria, if it is seen, it will only be reported when there is a presence of White Blood Cells at a category of more than 1+.

Yeast is reported only when bacteria is seen.

Sperm is only reported in males but not in females for confidentiality purposes.

After ensuring all results are changed and re-edited. We can verify the results of the patient for Urine FEME. We will verify urine results under Work Centre in the LIS. Section code will be UR which means Urine.

Next, enter the sample number of patient into LIS and click enter, and then record the results accordingly. Ensure that the results entered into the LIS are correct before saving. If not, a wrong result will be sent to the doctor and patient.

Below is a sample of a picture of the LIS Verified System when verifying results. For Urine FEME, we will verify under the Comment and Range columns.

This is the LIS system for verifying results drawn by me.


All these may be a little intense! If you dont understand any part of my post today! Feel free to ask questions, Im more than welcome to answer it for you!

All the best in your SIP, fellow classmates!

Jordan Wong Wei Jie
0703992H Group 09
TG02