Hey People! Sorry and I apologise for the late post!
Today i will be talking all about Urine Microscopic Examination
Microscopic Examination is performed under Urine FEME. FEME stands for Full Examination including Microscopic Examination. Therefore, for urine FEME, microscopic examination is included and it is quite an important component too. As mention in my previous post, I mentioned that Microscopic examination is actually performed to verify the results produced from the urine analyzers, Miditron Junior II or Cobas u 411 (Roche).
So how do we perform Microscopic examination?
1. Enter code 472100 to print out Urine FEME worksheet
2. Perform Urine Processing using the Urine Analyzer, Cobas U 411 and enter the results into the Worksheet
3. Charge 15.0ul of urine using the pipette into the Glasstic® Slide 10
4. View the Glasstic® Slide 10 under the microscope
Upon viewing of the microscope, we are supposed to look for the grids/chambers in the slide at 10 times magnification. After which, we will focus at 40 times magnification to view and count the cells. When counting the cells, we will only count the first 36 squares, meaning the first 4 rows of 9 squares.
There are three important cells that we need to look out for; they are mainly the Red Blood Cells (RBC), White Blood Cells (WBC) and Epithelial Cells.
Of course, when viewing the Glasstic® Slide 10 with microscope, we will also look out for other cells like Crystals, Casts, Bacteria, Yeast and Sperm etc.
The Picture below shows White Blood Cells and Bacteria

This Picture below shows Epithelial Cells

Yeast and Bacteria, if found in Urine sample, would infer that the patient is suffering from a bacterial infection or it may be due to a pre-analytical variation. Such as when the way we handle the urine samples and how the urine sample was collected from the patient. There may be a contamination when the urine is collected.
The Picture below shows Yeast Cells, and some with budding.

Under Crystals, there are amorphous crystals, calcium oxalate and uric acid. There are two types of amorphous crystals depending on the urine pH.
If the urine pH is acidic (less than pH7), the amorphous crystals will be called as amorphous urate.
If the urine pH is alkaline (>pH7), the amorphous crystals will be called as amorphous phosphate. The crystals when looked through in the microscopic looked very scattered around the chambers/grids and it looks bright.

Calcium Oxalate is also a common crystal found in patient’s urine. They have different shapes, like dumb-bell and the most commonly ones, the square shapes. They look shiny and bright too.

Uric acid looks often like leave shaped; they are often yellow to orange-brown in color. Under polarized microscopy they exhibit birefringence and many colors.

The casts are a glob or bunch of cells released from damaged renal tubules. While Casts, they look dull and faint; there are two types of casts we report in Urine FEME. Hyaline casts and Granular cast are the ones that we report.
This Picture below shows a Granular Cast

This Picture below shows a Hyaline Cast

In here, I will be telling you more about how we record all these on to the Urine FEME worksheet when we see these cells, whether is there is a need or not to record/report into the report for the Patient
.
For all cells we see, we categorize them into 4 different categories. There are Trace, 1+, 2+ and 3+. These 4 different categories represent the amount of cells in the urine during the microscopy examination; Trace, in short Tr being the least amount and 3+ being the most amount.
On the Urine FEME worksheet, the worksheet will include the sample number (0908100200), the name (Wong Jordan) and 16 columns for each patient. First ten columns will be used for the record of results from Urine Processing using the Cobas u 411 Analyzer. They are mainly, pH, Specific Gravity, Protein, Leucocytes, Glucose, Ketone, Nitrite, Blood, Bilirubin and Urobilinogen respectively. The next 6 columns will be used for the counting of cells from the microscopy examination. They are mainly, Red Blood Cells, White Blood Cells, Epithelial Cells, Casts, Crystals and Others. Under Other’s column, it refers to the Presence of Sperm, Bacteria and Yeast etc. Scroll down to look at a sample of the Urine Worksheet.
Upon getting the result from Urine Processing from Cobas u 411, we will record down the results on the first ten columns. Using the 4 categories, Trace (Tr), 1+, 2+ and 3+.
After recording all the 10 results of Urine Processing, we will have to make some changes or do some confirmatory tests.
Confirmatory Tests
For both Glucose and Ketone, as long as there is Trace and above, a Ketone and Glucose Confirmatory Test must be done by using the KETO-DIABUR-TEST® 5000.
For Bilirubin, if it is 1+ and above, there is a need to perform the Bilirubin Confirmatory Test by using to Icotest® Reagent.
For Urobilinogen, if it is 2+ and above, there is a need to re-process (do a dip stick again) and reconfirm the result of Urobilinogen using the Cobas u 411 analyzer.
For Protein, if it is Trace and above, we will have to look for cast. If there is no cast, we will need to centrifuge the urine for 3 minutes and reload the new sample and view under microscope to look for casts.
Changes we need to do
If Bilirubin is Trace, do not need to report, and record as Negative instead.
If Urobilinogen is 1+ and below, do not need to report and record as Negative instead.
For Nitrite, it is only reported positive when, white blood cell is more than 1+ (18) and bacterial is seen during microscopy examination.
When viewing Microscope, we will see Red Blood Cells, White Blood Cells and Epithelial cell, the three main ones. We also separate the each of them into 4 different categories after counting them. The 4 categories are Trace, 1+, 2+ and 3+ also.
After we see the number of cells in 36 small squares of the Glasstic® 10 Slide, we will multiply by 2.5 to get the actual total amount of cells. After which we will record down the number of each cells on each column and then make changes to the results of Blood, Leucocytes and Protein from Urine Processing, as microscopy examination is done to verify the results of Urine Processing.
For Red Blood Cells
Red Blood Cell Category Number of Cells (After multiplied by 2.5)
Trace 5 – 10
1+ 13 – 20
2+ 23 – 30
3+ 33 and above or >3000
For White Blood Cells and Epithelial cells
White Blood Cell & Epithelial Category Number of Cells (After multiplied by 2.5)
Trace 8 – 10
1+ 13 – 20
2+ 23 – 30
3+ 33 and above or >3000
In addition, there is a rule that we need to apply, which is whenever the RBC/WBC count is more than 1+ or Epithelial Cells is more than 18, we will have to change Protein to Trace under Urine Processing Results.
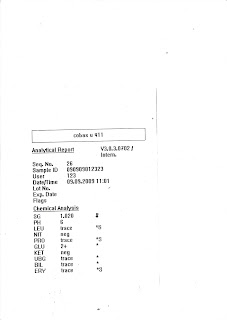
For example, look at the two pictures below, both shows 2 different results from Urine Processing of 2 different urine samples. The results will be written on the 10 columns as shown in the worksheet. Observe that the lab number and name is given. Now, moving on will be a microscopic examination of counting cells. So for my first urine sample, lab number 123, I saw 15 Red Blood Cells, 18 White Blood Cells and 0 Epithelial Cells. We will now make changes, where we will change the initially RBC Tr into 1+ and change WBC Tr to 1+ also. I also observed this urine sample have amorphous crystals. To determine what type of amorphous crystal it is, look at the pH result you got. Since, it is pH 6, the type of crystal is Amorphous Urate (AU) and I report it under the Crystal column. I also observed that there are Bacteria in the urine sample, in order to report Bacteria under Others column, WBC must be 1+ and above. Since my WBC is 1+, I can report Bacteria. As I said, if Bilirubin is Tr and below & Urobilinogen is 1+ and below, report as Negative, thus change both the results to Negative as shown.
Urine Processing Result 1
Urine Processing Result 2
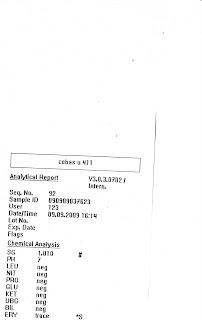
For the second urine sample that was performed. The results shown were quite normal except for Trace in RBC. After looking at the microscope, if no RBC is seen and no other cells seen, we will just put a 1 under Epithelial Cell column to show that this urine sample is “clean” meaning no cells seen. And also, change the RBC from Tr to Neg.
Urine Worksheet Before Edit (Before Microscope Examination)

Urine Worksheet After Edit (After Microscope Examination)

Reporting of Crystals, Casts and Other Cells
If we see Cast and Crystals, we will report under the Cast and Crystal columns respectively. Other column will be for cells like Sperm, Yeast and Bacteria
For Cast, we report only Hyaline Cast (HY) and Granular Cast (GR)
For Crystals, we report Calcium Oxalate (CA), Uric Acid (UA), and Amorphous Urate
(
pH7 – AP)
For bacteria, if it is seen, it will only be reported when there is a presence of White Blood Cells at a category of more than 1+.
Yeast is reported only when bacteria is seen.
Sperm is only reported in males but not in females for confidentiality purposes.
After ensuring all results are changed and re-edited. We can verify the results of the patient for Urine FEME. We will verify urine results under Work Centre in the LIS. Section code will be UR which means Urine.
Next, enter the sample number of patient into LIS and click enter, and then record the results accordingly. Ensure that the results entered into the LIS are correct before saving. If not, a wrong result will be sent to the doctor and patient.
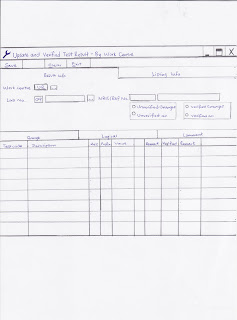
Below is a sample of a picture of the LIS Verified System when verifying results. For Urine FEME, we will verify under the Comment and Range columns.
This is the LIS system for verifying results drawn by me.
All these may be a little intense! If you dont understand any part of my post today! Feel free to ask questions, Im more than welcome to answer it for you!
All the best in your SIP, fellow classmates!
Jordan Wong Wei Jie
0703992H Group 09
TG02


